


Llandegfedd Sailing Club, Penelope Winch
This is the start of a page with instructions on the winch and possibly the Race Management and PV stuff on Penelope
More ought to come. some pictures will go.
Pictures show
- Winch with its power cables
- The PV controls and winch changeover switch
- The gory innards of the control box (not our best example of handiwork)
- Circuit diagram - being written up properly, 90% done
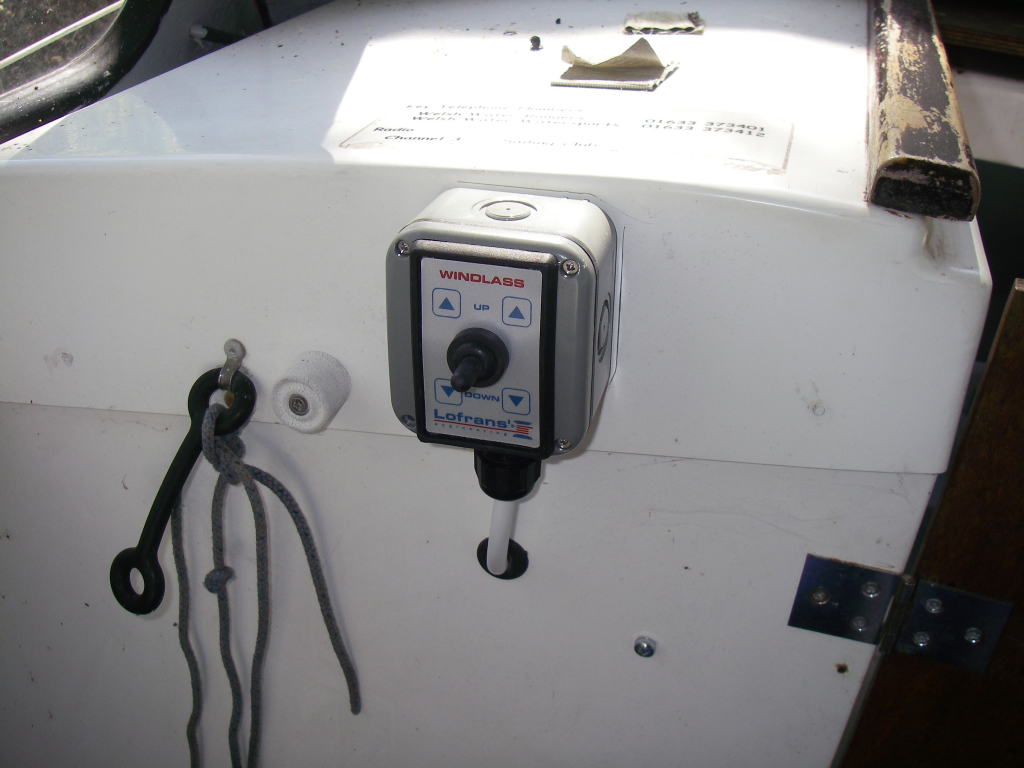
- Control box, mounted on side of hull at forward port end of the cabin.
- Three pictures of Penelope, painted, polished and ready to go
Outline of Winch use
There are some wrinkles to iron out. Please not the block quote below - it will be removed once all is resolved.
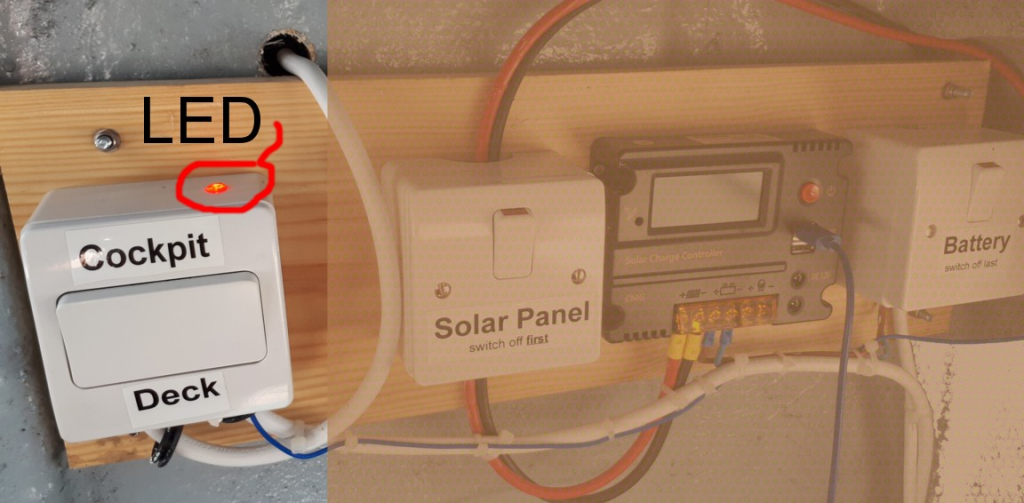
The winch will now only operate when the Outboard Motor ignition is switched ON. You should see a small LED lit when the winch is enabled, this LED is on the Cockpit/Deck switch. You need the key in the motor controls just as if you were driving. It is preferable to run the motor as it will then provide some charge to the battery whilst the winch is in operation. The majority of the power actually comes as a long term trickle charge from the Solar panels throughout the week, so the battery is most likely to be fully charged at all times.
Where are the controls?
The winch can be used from two places. One is by the driver, using the switch next to the cabin door. It is annotated, but fairly obviously you push the switch UP to raise the anchor, and DOWN to lower it into the water.
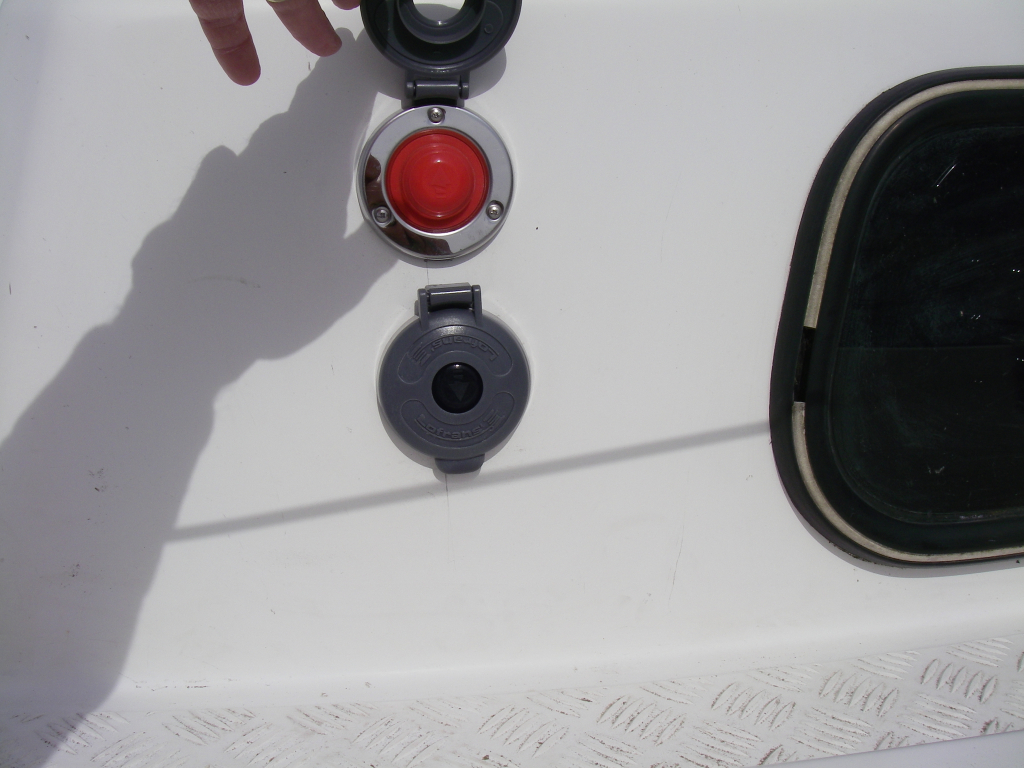
The second controls are for use when there are two people on board, and one can go and supervise from the Port Deck at the bow. There are two switches, the Upper one LIFTS the anchor, and the lower one LOWERS it. NOTE: these are meant to be foot switches, so they need pushing fairly hard. Lift the cover first, as shown in the second picture here.

For safety, The winch can only be controlled from one place at once. There is a changeover switch in the cabin (port side). Pressed at the top, it is in Cockpit mode. Press at the bottom, in Deck mode.
Leave the other switches as they are - ON so that the battery charges from the PV solar panels. The labelling is for anyone doing maintenance or setting up for winter.
Using the winch
Please leave the outboard motor running when you use the winch. It will be charging the battery slightly, and will give a larger battery margin for repeated winch use.
You will need to untie the anchor before it can be dropped. It has a lashing to secure it on the bow. When finished for the day, secure it so it cannot fall and damage the hull. One picture in the carousel shows Richard and Matt working out how to do this
The bottom 8m of the attachment to the anchor is chain. You will hear it going out and coming in. After that, there are markers every 8 metres along the rope so you have an idea how much you have put out. We expect that you should point the boat into the wind, and then let out the rope. Once a length is out, you can let the boat drift back. You need to let out enough so that there is about 3 times the anchor rope as depth of the water.
As of late May 2021, there is an issue in that the rope can wind itself around the winch roller and jam when lifting the anchor. “Its not heavy enough” to drop cleanly into the chain locker. This makes it all a bit tricky to use, but there is a safe work-around if there are two people on board. One has to gently pull the rope away from the winch as it comes into the chain locker, under the deck. DO NOT PUT YOUR HANDS NEAR THE ROPE OR CHAIN GOING INTO THE WINCH. We have a call out to our suppliers to see if there is a different sort of rope we should be using. Therefore let's hope this is a temporary matter.
The anchor rope should sort itself out as it is dropped straight into the chain locker. When lifting the anchor, there are black markers on the rope every 8 metres, so you can track that it is coming in. The final 8 meters is chain. This will make a noise so you can tell you are near the end and get ready to release the switch. I think there is a marking on the chain when nearly at the end.
To recover, drive slowly forwards and take up the slack in the rope until the rope is vertical. (Can we see it?) Then wind in all rope and chain before you drive off.
These will be updated and turned into a little document to go with the rest of the OD Duties documents page.